You may personalise your Outlander PHEV experience using MITSUBISHI Remote Control on your phone.
When you join the wireless LAN of your PHEV, you can
- Charge your car on demand or according to a timer.
- Before a drive, heat or cool your vehicle.
- Use timers to guarantee that your PHEV fully charges and to avoid peak pricing periods.
- To assist you to find your car, turn on your headlights or parking lights.
- Verify your car’s status.
You can see every car setting on MITSUBISHI Remote Control’s user-friendly dashboard. Directly from your connected device, regulate timer settings for charging and climate control, keep track of battery health and performance, and create personalised weekly routines that suit your needs.
The only method of communication between your Outlander PHEV and this app is wireless LAN; cellular technology is not used at all. Physical barriers, radio waves, and distance can all obstruct wireless LAN connections.
Your car’s SSID and password can be located on your registration card as well. In order to successfully connect and register your vehicle to your app, please keep these close at hand.
Check that you have the correct App from the App Store or Google Play Store.
How to register.
-Close the driver-side door before carrying out this action.
-Turn on the Hazard lamps.
-Turn the power switch to the ACC power switch orange colour, without pressing the brake pedal, then within 10 seconds, press LOCK and UNLOCK on the key fob alternately 10 times in total.
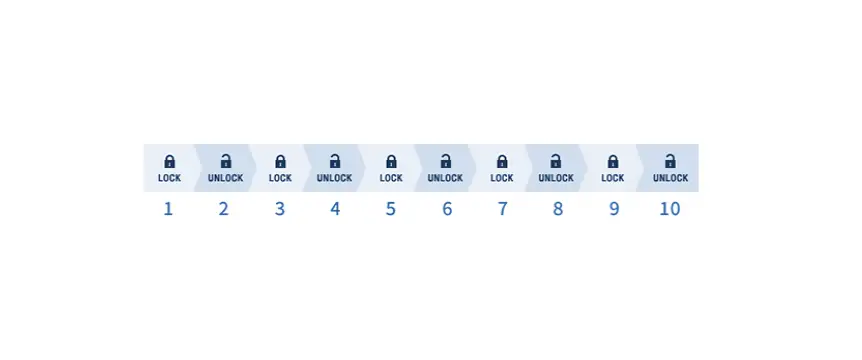
1 device has been registered: 2 beeps
2 devices have been registered : 3 beeps
The registration process after this step needs to be finished within 5 minutes. The number of registered wireless devices connected will be indicated by a metre buzzer. A maximum of two devices can be registered. If 2 device is registered need to delete.
Depending on how many wireless LAN devices have been registered, a buzzer will sound.
Registration Deletion Mode:
-Close the driver-side door before carrying out this action.
-Turn on the Hazard lamps.
-Turn the power switch to the ACC power switch orange colour, without pressing the brake pedal, then within 10 seconds, press LOCK and UNLOCK on the key fob alternately 20 times in total.
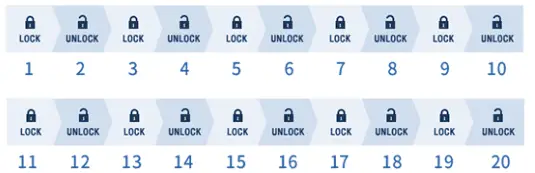
If the registration information is totally removed, a buzzer will sound. (1beep) “Registration Deletion Mode” is terminated by turning off the Hazard lamp and pressing the power switch to the OFF position.
If you want to use the MITSUBISHI Remote Control App after the registration information has been deleted from the vehicle, you must utilise the “Cancel VIN Registration” option in the MITSUBISHI Remote Control App’s “Settings,” and you must register your wireless device to your vehicle again.
Connect to the vehicle’s WiFi
Prepare your SSID and password to connect to your vehicle.
On your iPhone or iPad Navigate to Settings and select “Wifi.”
Choose the SSID
Enter the password from the registration information card or paper provided by the dealer when required.
Return to the APP once connected.
Error Codes
If you encounter a problem while attempting to utilise the Mitsubishi Remote Controls App, solutions can be found here.
1101, 2101 Main Factors cannot be registered
The power switch is not in the ON position.
The vehicle is in contact with another smartphone.
In registration mode, 10 minutes have passed.
An incorrect password was input.
The vehicle is out of range.
The smartphone operating system automatically limits communication with the car.
Solutions
Register from the beginning again.
On the registration information card, confirm your SSID and password. If you do not have the registration information card, an Authorized Mitsubishi Dealership can provide you with the SSID and password. (Please contact your local Authorized Mitsubishi Dealer ahead of time.)
To register a second device, if the first device is nearby, make sure the app on the first device is closed.
If you are still unable to register, please repeat the registration process.
Main Causes of Registration Errors 1102, 2102
The vehicle’s VIN number could not be retrieved.
Solutions
Please repeat these steps and try to register again.
If you are still unable to register, please repeat the registration process.
Main Causes of Registration Errors 1103, 2103
The maximum number of registered devices (2 devices) has been reached.
Solutions
Please remove the VIN from the registered device. Alternatively, repeat the registration process.
No security update for 1104, 2104
Important Factors
Your vehicle’s security upgrade has not yet been completed.
Solutions
Please contact your nearest Authorized Mitsubishi Dealer to begin the security update servicing campaign.
1201, 2201: Communication breakdown
Important Factors
The power switch is not turned off.
The vehicle is out of communication range.
Another smartphone is in contact with the vehicle.
To keep the 12V battery charged, the car suspends the connection.
When your smartphone is connected to the Smartphone Link Display Audio System.
The smartphone operating system automatically limits.
Solutions
Check to see if communication is possible in the vicinity of the car
If ‘Settings’ > ‘Wireless LAN communication Settings’ > ‘Always Communicate’ = OFF, make sure the vehicle’s power switch is turned off.
Check to see if the vehicle’s SSID is visible in the smartphone’s operating system’s “Settings” > “Wi-Fi.” If you are not displayed, proceed to STEP5 of the given procedures.
If you are still unable to communicate, please repeat the registration process.
Main Factors: 1301, 2301: Passcode Error
The password is wrong.
Solutions
Enter the proper passcode. If you cannot recall the proper passcode, repeat the registration process.
Climate Timer
Examine your vehicle’s climate action status. For example, running cooling, waiting for heating, and running the defroster.
Vehicles equipped with a switch-type electric parking brake can programme up to five climate timers to perform a specific climate action at predetermined times throughout the week.
-You can check the status of the pre-A/C system.
-First, choose a climate mode.
-You can select Defrost, Heating, or Cooling as your climate setting.
-When the ELECTRIC HEATER is not present, the Climate Control Mode can only be Cooling.
-Next, select the timer you want to use.
-Set your climate control’s start time.
-Which day(s) do you want it to happen again?
-Finally, you can choose the duration of Syncing with the car.
If your vehicle has a manual parking break with a lever.
Examine your vehicle’s climate action status. For example, running cooling, waiting for heating, and running the defroster.
Vehicles equipped with a lever-type manual parking brake can programme up to three climate timers to perform a specific climate action at predetermined times throughout the week.
Configuring a Charging Timer
Examine the charge status of your car’s battery. Charge statuses such as Normal, Trickle, Quick, and Waiting are examples.
If you have a Time-of-Use contract with your utility company, you can easily charge during off-peak pricing periods. Vehicles equipped with a switch-type electric parking brake can programme up to five charge timers for different days to manage when your PHEV draws electricity from its outlet. Please keep in mind that charging will begin regardless of the timer in the case of quick charging.
Tap the white dot to the right of the schedule button to cancel all timers and charge immediately. Timers will be restored the next time you turn on your vehicle.
-To activate the timer, choose it.
-Set a start time.
-Set the finish time.
-Choose which days of the week you want this timer to repeat.
-Finally, you can choose Full Charge Syncing with Vehicle.
If your vehicle has a manual parking break with a lever.
Examine the charge status of your car’s battery. Charge statuses such as Normal, Trickle, Quick, and Waiting are examples.
If you have a Time-of-Use contract with your utility company, you can easily charge during off-peak pricing periods. Vehicles with a lever-type manual parking brake can programme up to three charging times for each day of the week to determine when your PHEV will take electricity from its outlet. Please keep in mind that charging will begin regardless of the timer in the case of quick charging.
Tap the white dot to the right of the schedule button to cancel all timers and charge immediately. Timers will be restored the next time you turn on your vehicle.
Vehicle Locator
When you are within Wireless LAN range, you can control your PHEV’s lighting systems to assist you in finding your vehicle.
You can use this button to turn on your vehicle’s parking lights or headlights for a set amount of time.
Settings
You can change the operational parameters of your vehicle as well as the app settings from the Settings menu.
-Remove the Passcode Input
Set up a passcode to provide an extra degree of security and prevent unauthorised people from accessing your vehicle’s controls.
-Password Alteration
Change the passcode that allows a user to access the app.
-VIN cancellation Registration
Unregister your vehicle from the app. If the number of registered Wireless devices is zero, you must initialise the vehicle SSID, planned Charge and Climate timers or the car’s Wireless LAN connectivity will cease.
Change the SSID
Customize the network name that your vehicle transmits over wireless LAN.
The SSID of the car. (The registration information card is being prepared.)
Charge Timer Settings and Climate Timer Settings schedules
The vehicle’s wireless LAN communication will be disabled. (Your wireless device will not be able to locate the vehicle.)
-Modify the SSID
Customize the network name that your vehicle transmits over wireless LAN.
-Modify the Wireless LAN password
To boost security, you can alter the wireless LAN password from the default value. Please remember the new password and keep it in a secure location.
-Wireless LAN Communication Preferences
Choose whether you want your vehicle’s network to constantly broadcast and communicate with your mobile device.
Wireless LAN connectivity on the vehicle side is always ON when “Always Communicate: ON.”
When the “Always Communicate: OFF” option is selected, wireless LAN connection on the vehicle side is enabled only when the vehicle power switch is turned off.
Please turn “Always Communicate: OFF” when utilising the Smartphone connection display audio.
-Wireless LAN Channel Configuration
You can choose channel 3 or channel 8 to eliminate interference and improve connectivity between your vehicle and your mobile device.
-Vehicle Configuration
ETACS (Electric Time and Alarm Control System) functionality for your car can be simply customised. You have access to and can change the functional settings of your vehicle from the convenience of your mobile device.
-Vehicle Power Supply from Outside
When your home loses electricity, you can use your vehicle to activate the External Power Supply (V2H / V2L equipment).
When the power supply cannot be started owing to a power failure, this function is used. Without activating this function, the V2H / V2L function can be used when the external power supply is turned on.
Your vehicle may not support this function. Please contact an Authorized Mitsubishi Motors Dealer for more information.
This functionality requires the External Power Supply that corresponds to it.
-Theft Alarm Record
You can view any theft alarm history associated with your vehicle.
0 Comments